The Problem:
There are cinder blocks that are supporting the asphalt next to the cement garage apron and the sand and dirt in the holes in the blocks erode away. This is due to builders taking shortcuts by not properly filling the holes in and also by improper drainage of water away from the house which erodes the sand away from under the blocks (from the previous owner who never cleaned the gutters....)
The Expensive Solutions:
The asphalt began to sink last summer and not knowing how to repair it, I called for many quotes. Most asphalt companies wanted $600 to repair it by taking out a 3ft section and filling it all in. They said it may not completely solve it and the whole thing may need to be replaced eventually. I called a concrete guy next to see how much it would be to put in a concrete driveway. He was quoting around $3300 which was cheaper than a whole asphalt driveway. If or when I need to replace the whole thing, I'm going concrete.
Temp Fix #1:
For a temporary fix, I used some driveway blackjack stuff to seal up the space between the asphalt and the cement for a quick fix before winter to keep water from freezing and doing some major damage.
Temp Fix #2 (only temporary until I need to replace the whole driveway):
Fast forward one year and I'm thinking that fix might hold again but nope I drove over the apron two weeks ago and a chuck about the size of a softball fell through. Now I have a major problem that needs to be fixed before winter, and I'm not putting $3k down for a new driveway with the holiday's coming up.
So here's what I did:
Step 1: Use a hammer to remove the remaining sunken areas along the apron.
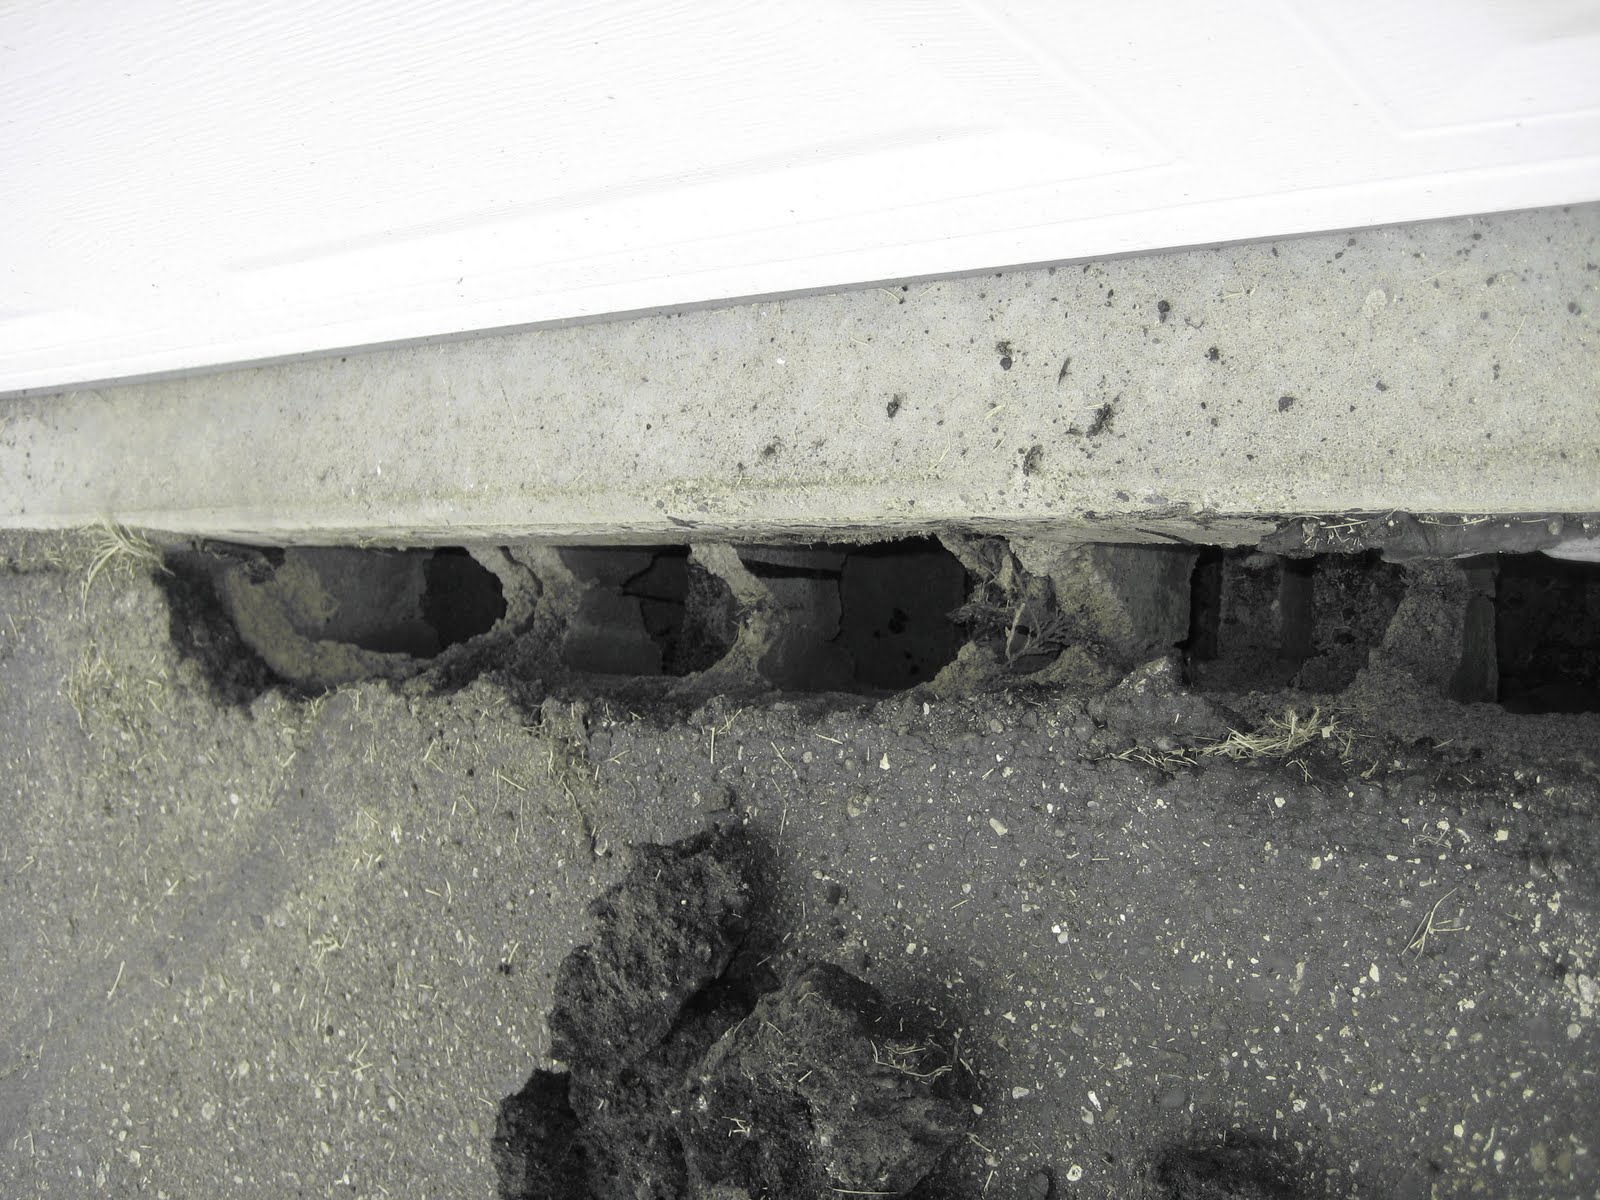
See the 3ft deep holes in between the cinder blocks? This is bad. This step took about 2 hours with a hammer, chisel, and a superbar.
Step 2: Fill in the holes with class 5 gravel, pack down as best possible, then fill with crushed limestone.

I used a 1"x1"x5ft long pine board to tamp the class 5 gravel down. I filled about 4" then tamped. It was the longest part of the process and the most grueling. I went though about 1/2 cubic yard of class 5. On top of the class 5, I used some larger crushed limestone, tamped it down and left about 1" to 1.5" of space from the top which would be used to put the asphalt patch in. This was all found at our local gardening and landscape center, much cheaper than buying bags of stuff from a home improvement retailer. Afterwards, I sprayed water over the apron and the freshly laid rocks to clean off dirt and provide a better surface for the cold asphalt patch to adhere to. I also figured the large limestone rocks would be less dusty than the class 5 gravel and having large chucks to support the asphalt patch. This whole step took about 3 to 4 hours including trips to the store.
Step 3: Fill int he rest with cold asphalt patch.

This stuff is nasty. It's sticky, and gets everywhere. Use gloves and pour some into the hole, stopping every 1" of depth to tamp down with a 2"x4" board turned on its side. I had some fantastic help from my wife who scooped this out of the bag with a wood shim while I held the bag and massaged the pebbles of patch up to the spout we cut from a corner. This step took about an hour.
I need to have the whole driveway sealed (previous owner never did that either...) so this was an important repair to get done before I have it sealed.
Just very glad to have this project done. The beers are tasting very good right now. Now to relax for the rest of the Labor day weekend!
I like all information that you provide in your articles.
ReplyDeleteasphalt sealcoating equipment
Well done, you did good
ReplyDeletedriveways essex
Great post, I appreciate you and I would like to read your next post. Thanks for sharing this useful information.
ReplyDeleteResin driveways Bournemouth
Resin driveways Poole
Resin driveways Dorset
Thanks for posting this informative article thanks for sharing your great post,wish you have a nice day,happy every day.
ReplyDeleteResidential Paving Atlanta & Concrete Contractor Atlanta
i just wanna thank you for sharing your information and your site or blog this is simple but nice article I've ever seen i like it i learn something today..
ReplyDeleteRoofing Contractor Lawrenceville & Commercial Roofing Loganville
You got a really useful blog I have been here reading for about an hour. I am a newbie and your success is very much an inspiration for me.
ReplyDeleteBest Remodeling Contractor Fairfax va & Bathroom Remodeling va
Nice to be visiting your blog again, it has been months for me. Well this article that I've been waited for so long. I need this article to complete my assignment in the college, and it has same topic with your article. Thanks, great share.
ReplyDeleteRoof Cleaning Westlake & Siding Contractors strongsville
This is a great blog, usually i don't post comments on blogs but I would like to say that this post really forced me to do so!
ReplyDeleteCommercial Roofing Edison & Roofing Paterson
Thank you all for the comments. Just today I decided randomly to start posting again. Not sure if I'll have too many home improvement posts like the driveway repair, the reason I posted that one was because I couldn't find anything remotely close to a how to guide. But given your responses, maybe there is a need for some additional how to if I do tackle anything, I'll consider it. Thanks again all.
ReplyDeleteI liked the content on this site. Would like to visit again.
ReplyDeleteWindow Repair London & Glazier South East London
Damn...if only I have seen this earlier this year...I could've saved some $$. Now I'm dealing with a poor concrete apron job a local biz just did on my drivway :(
ReplyDeleteGreat post. Thank you for sharing this information about your entrée de garage. Good Job!
ReplyDeleteThanks for sharing this post. Your all information is very nice. If you want some more information you can visit Asphalt Installation Syracuse NY
ReplyDelete